
- Details
- Written by: Ayhan Akkaya
- Category: EWM Articles
- Hits: 133
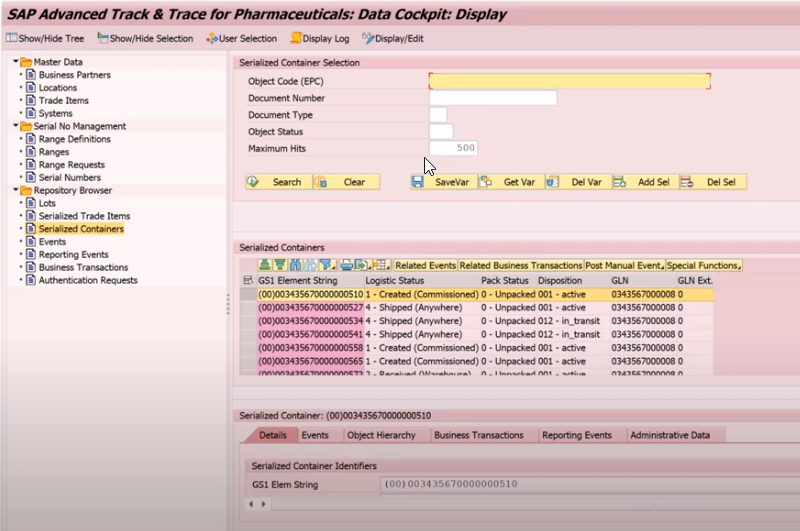
SAP Advanced Track and Trace for Pharmaceuticals Data Cockpit "/n/sttp/cockpit"
Serial Number Length: Defines the length of the serial number; SAP Advanced Track and Trace for Pharmaceuticals supports serial number lengths between 1 and 40 digits.
- Master Data
- Serial Number Management
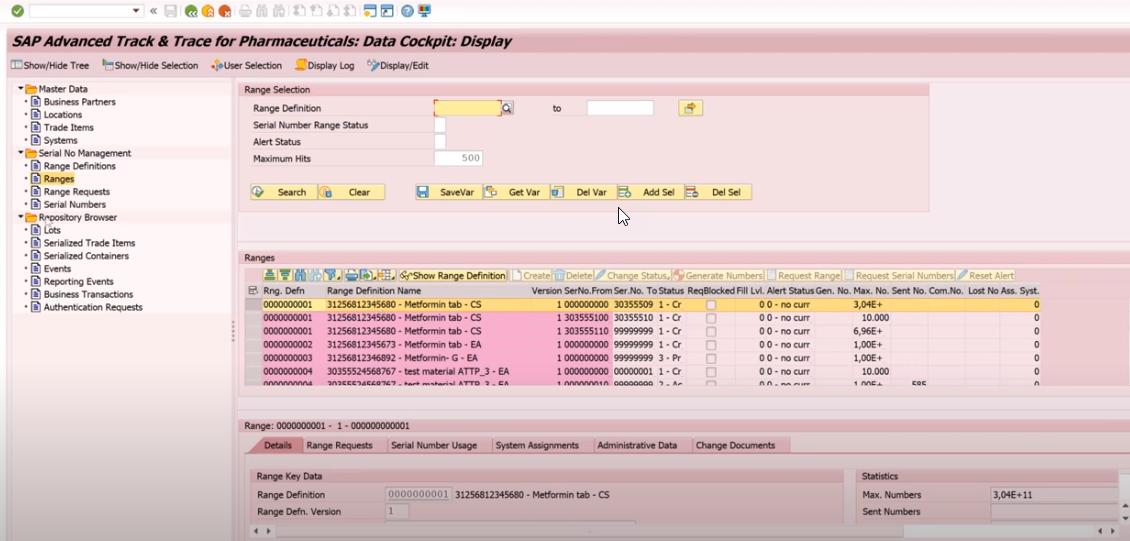
- Range Definitions
- Ranges
- Range Request
- Serial Numbers
- Repository Browser
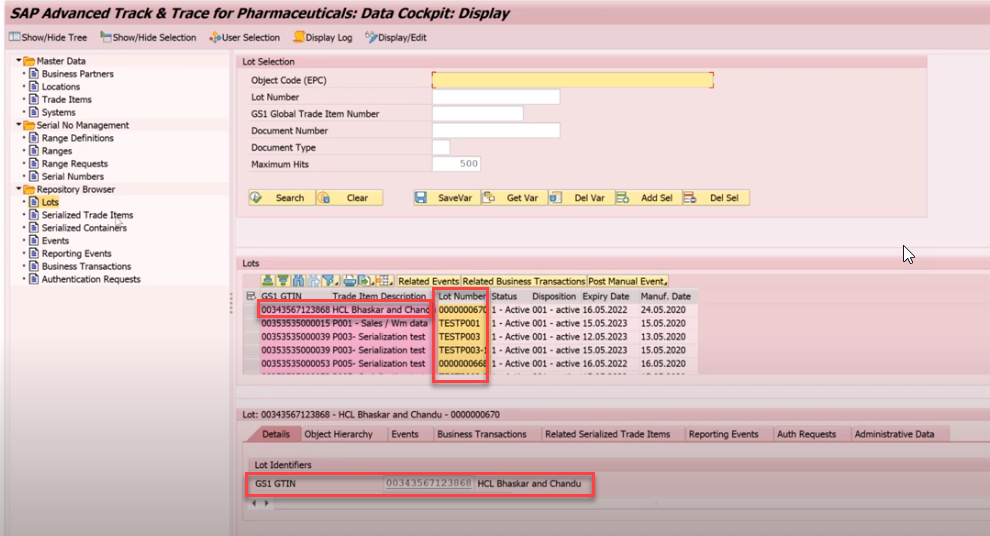
- Lots/"Batch" - Lot is also known as a Batch or LGTIN and is a non-serialized quantitative object with a quantity that is typically more than 1.
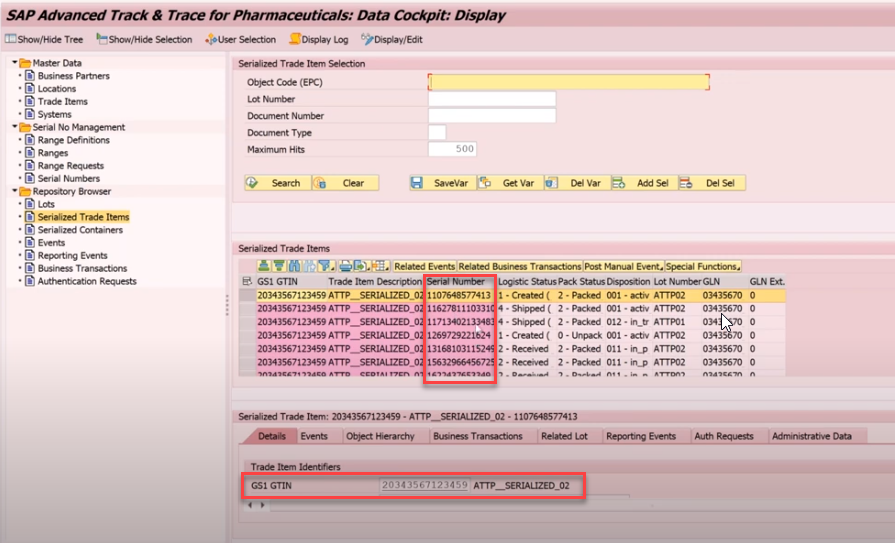
- Serialized Trade Items - Serialized Trade Items are identified by GTIN and the serial number
- Serialized Containers /"Pallets" A serialized shipping container code (SSCC) is a uniquely identifiable transport unit like a pallet or a carton
- Events
- Reporting Events
- Business Transactions
- Authentication Requests
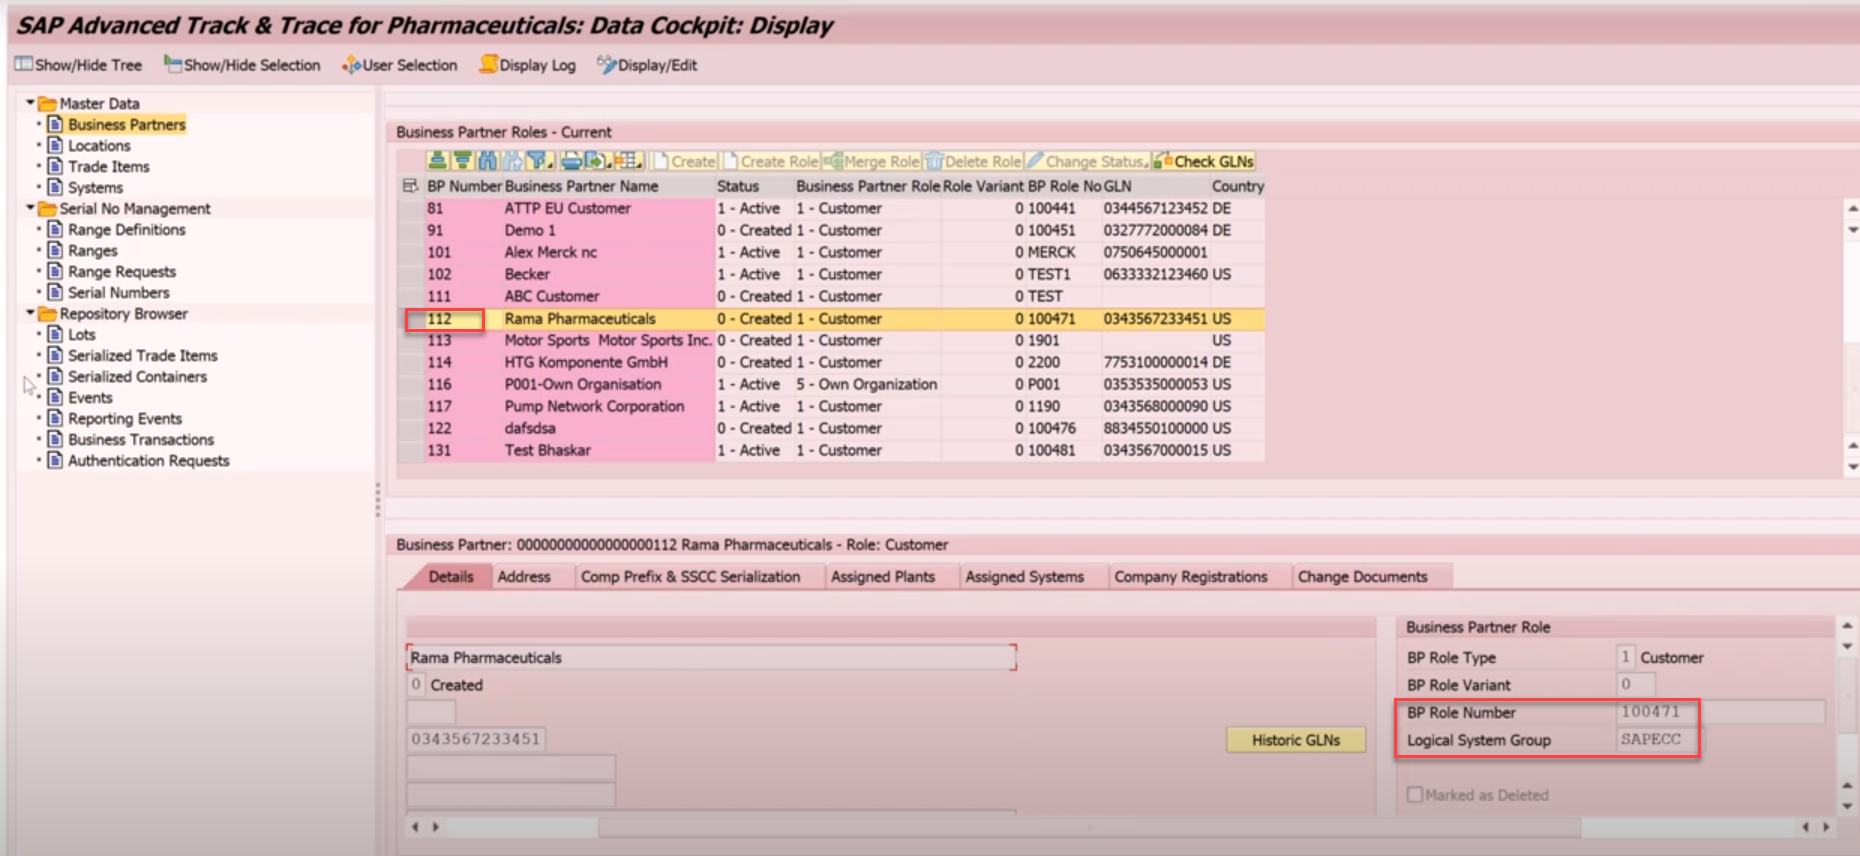
- Business Partners are any trading partners with whom traceability data is being exchanged, for example, a CMO (contract manufacturing organization), CPO (contract packaging organization), wholesaler, Third-party Logistics (3PL) company.
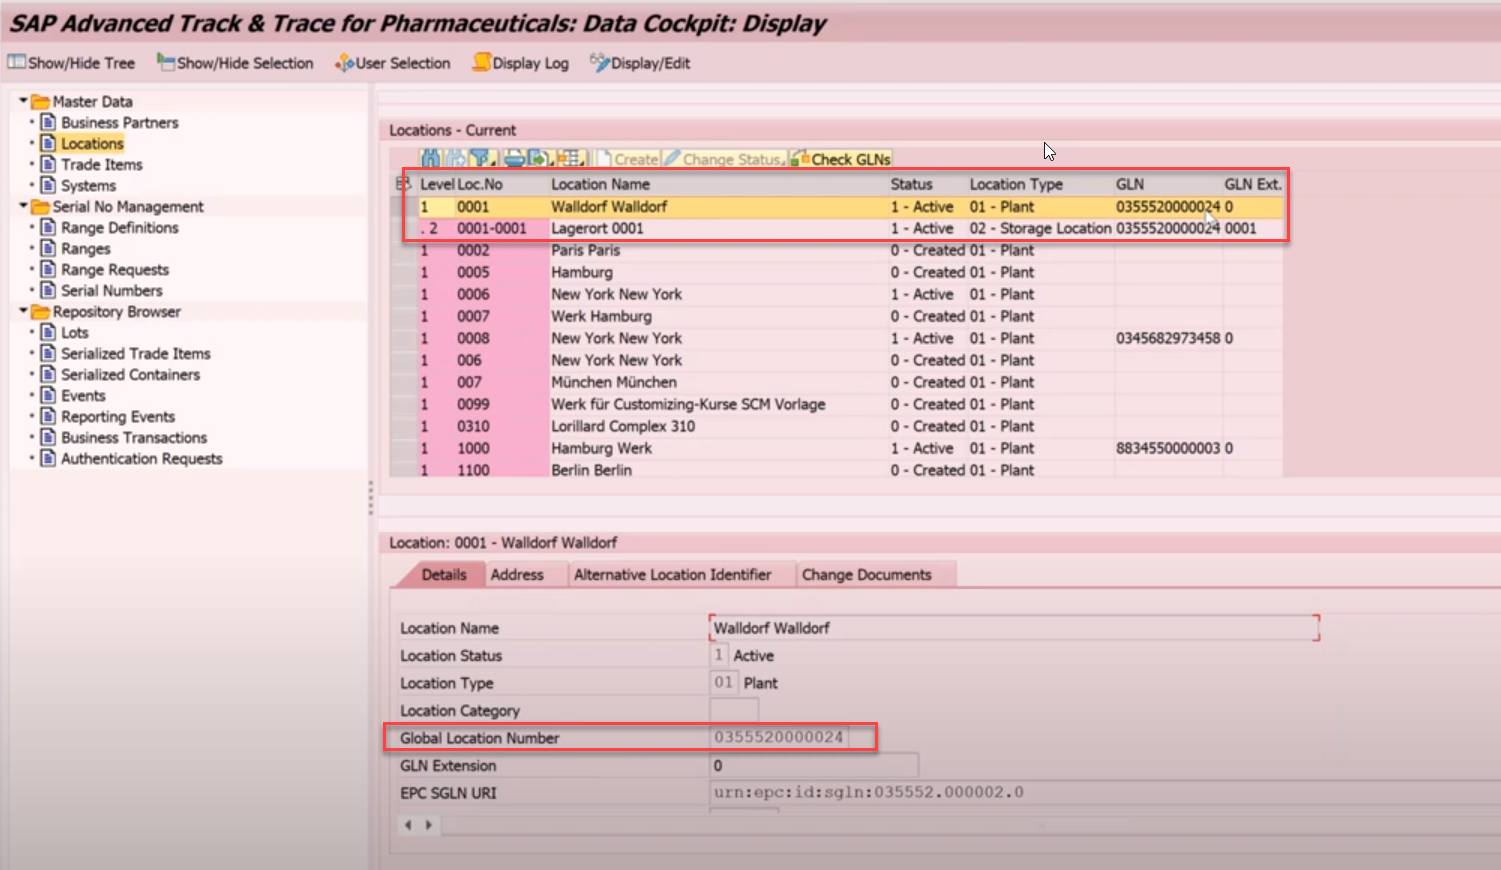
A location typically represents a plant or a storage location but it can also represent other entities such as storage bins or resources.
- Status: This field describes the status of the location.
- Global Location Number (GLN) and GLN Extension: The global location number and GLN Extension assigned to a location are used as an additional external identifier of the location.
- SGLN: The SGLN is an encoded representation of GLN + GLN Extension in EPC URI format.
- Location Business Partner Number: This field displays the business partner to which this location belongs to.
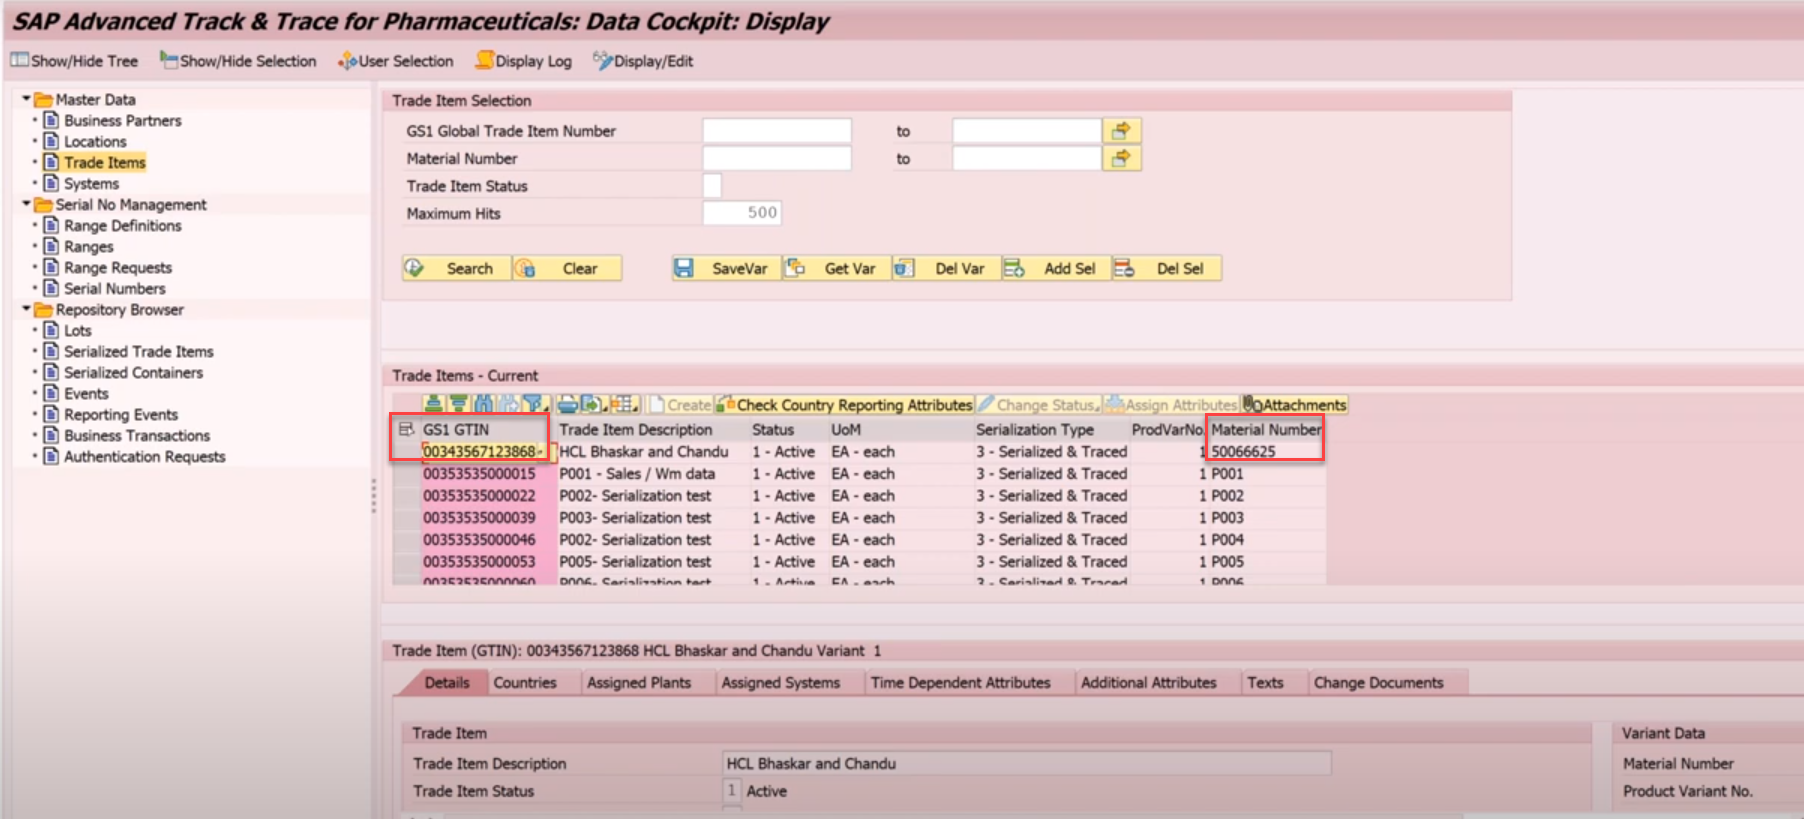
In SAP Advanced Track and Trace for Pharmaceuticals, Trade Item is identified by the Global Trade Item Number (GTIN).
Trade items are typically integrated from SAP ECC materials but they can also be maintained locally in the SAP advanced Track and Trace for Pharmaceuticals system and one can also integrate Trade Items from other non-SAP ERP systems.
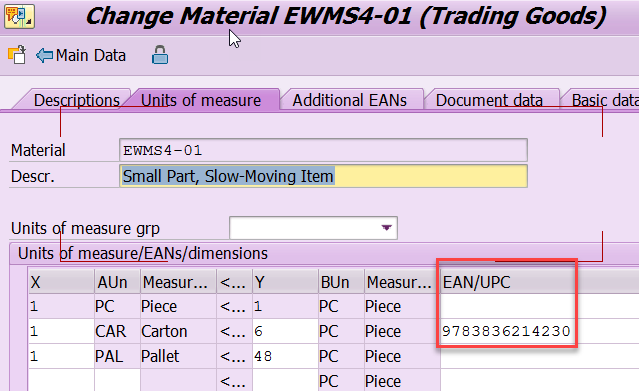
One trade item can have multiple product variants. ERP systems like, for example, SAP ECC typically manage trade items as materials and the GTIN is assigned to one of the alternative UoMs of the material
-
-
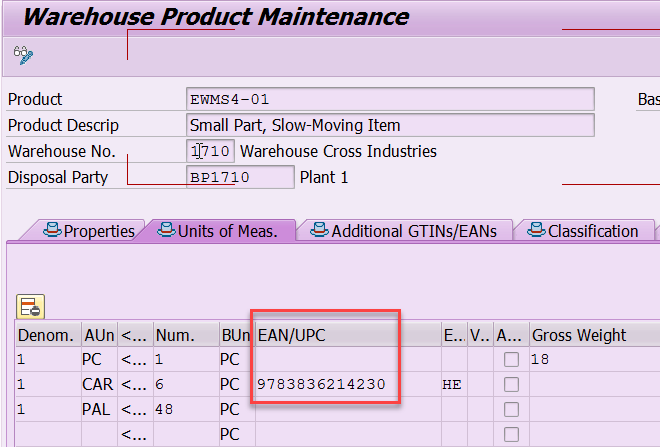
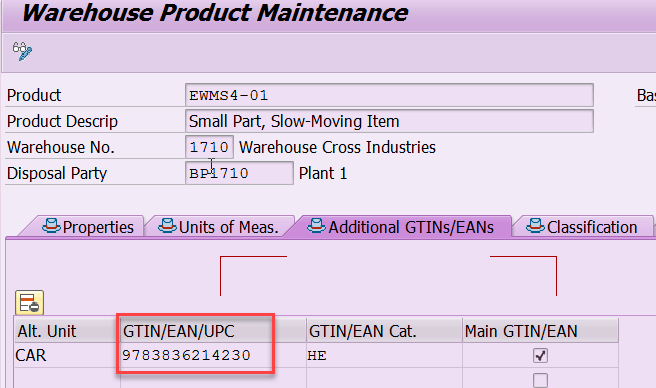
Global Trade Item Number: GTIN is the primary key of the trade item. This is a 14 digit number which can be used by a company to uniquely identify all of its trade items. A GTIN consists of the Company Prefix, Item Reference and a calculated Check Digit.
-
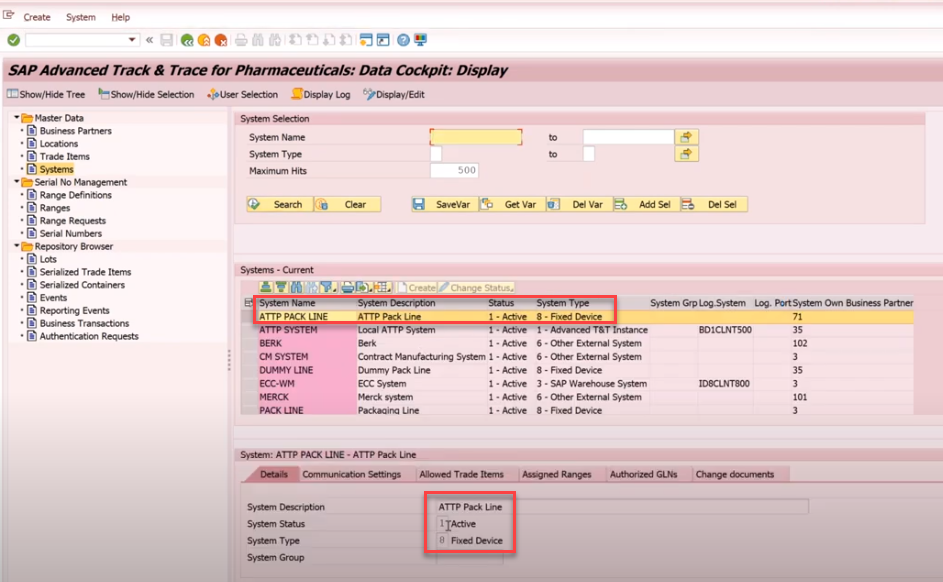
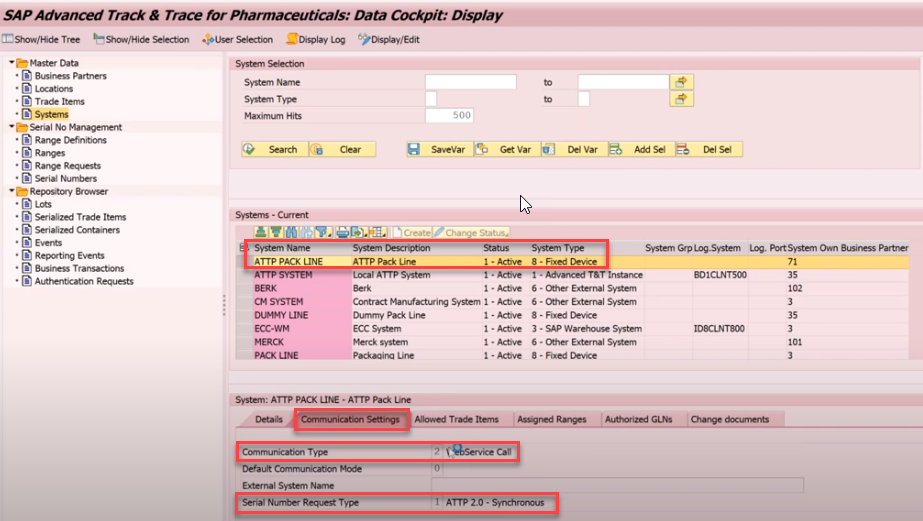
Systems are used for all communication with known external systems. Given below are the important attributes of a System:
-
System Name: Use this field to specify a name to identify the system.
-
System Description: Use this field to give a description to the system.
-
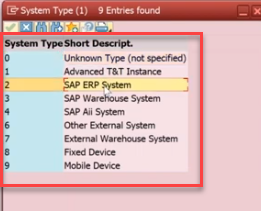
System Type: Use this field to define the system type. System types are predefined by SAP.
-
Business Partner of System: The Business Partner of the system specifies to which Business Partner the system is assigned. This typically means that this system is owned by the respective Business Partner. If a system is configured to receive serial numbers, you have to maintain the Business Partner to enable validation later during commissioning of serial numbers. If the Business Partner is not maintained, then commissioning of Serialized Trade Items fails.
- Serial number request parameter:
-
Allow Serial Number Request for all Trade Items: Selecting this check box indicates that the system can request serial numbers for all trade items. Alternatively, instead of selecting this check box, the allowed trade items can be explicitly added on tab Allowed Trade Items and then the system is only entitled to request serial numbers for all explicitly added trade items.
-
Allow SSCC Range Request: Selecting this check box indicates that the system may request serial numbers for SSCCs.
-
Maximum Serial Numbers per Request: You can define the maximum number of serial numbers that this system will receive per request. If the system requests more than the number specified here, then the returned number is reduced to the maximum number.
- Default Outstanding Numbers: With defining outstanding numbers you can limit the total outstanding serial numbers a system can request. Outstanding numbers are the serial numbers requested by a requesting system for a particular trade item (GTIN) or SSCC (GCP) which are not reported back as commissioned or lost. Default outstanding numbers define the maximum outstanding numbers that will be taken as a default for this system.
-
-
Communication Settings:
-
Communication Type: Use this field to define the kind of communication for data transfer between systems. You can choose either an RFC Call or a Web Service Call. In some cases the communication type is predefined, depending on the type of data exchanged with the system:
-
External systems are typically connected through web service connection
-
Local SAP Advanced Track and Trace for Pharmaceuticals instances always communicate through RFC
-
Systems for Regulatory Reporting are typically maintained with communication type web service. For more information, see Integration of External Systems .
-
-
Default Communication Mode: You can define whether default communication shall happen synchronously or asynchronously. This parameter is only taken into consideration if not defined within the context.
-
External System Name: This is the system name by which your system is known when connected to another system. Whenever you need to communicate with the other system, you use the name of this external system. The system owner of the other system needs to provide this external system name for the two systems to communicate.
-
Serial Number Request Type: The solution supports three types of serial number requests. For further details see Serial Number Exchange.
-
ATTP 1.0 – Synchronous
-
ATTP 2.0 – Synchronous
-
ATTP 2.0 - Asynchronous
-
- Communication Adapter: Assigning communication adapter to the system will enable all outbound SOAP communication to be processed via an adapter processing logic instead of ATTP logic. You need to implement adapter processing logic in BAdI if you want to use it. You can specify new communication adapter using transaction /STTP/COM_PRFL and logical port for adapter using transaction /STTP/COM_PRFLA.
-
RFC Settings: Specify the setting only if you have selected the communication type as RFC Call.
-
Logical System: Specify a logical system ID of the connected system.
-
-
Web Service Settings: Specify these settings only if you have selected the communication type as a Web Service Call.
-
Logical Port: Specify the logical port of the connected system.
-
-
-
-
Allowed Trade Items: In this tab, you maintain all trade items for which the system can request serial numbers. Note that this maintenance is only required if you have not selected the check box Allow Serial Number Request for all Trade Items In addition, for each trade item you can define the maximum outstanding numbers that this system can have for a particular trade item. If not defined here the default outstanding numbers defined on the tab Details will be taken for this trade item.
-
Assigned Ranges: This tab displays the ranges which are currently assigned to the system. The assignment is done in range management. From this tab, you can navigate to the Range screen to review the assigned Ranges.
- Authorized GLNs: This tab is currently only relevant for the feature Requesting EPCIS Messages. Here you can maintain the GLN groups for which this particular system is authorized to request EPCIS messages in addition to the standard GLN authorizations derived via the business partner assigned to the system. For more information, see Requesting EPCIS messages and the developer guide SAP Advanced Track and Trace for Pharmaceuticals: Requesting EPCIS Messages on the SAP Help Portal at http://help.sap.com/attp .
-

Lot is also known as a Batch or LGTIN and is a non-serialized quantitative object with a quantity that is typically more than 1. A physical lot may be present at the same time in many different places with partial quantities and therefore cannot be uniquely identified.
A lot is identified by its GTIN and its lot number and you can convert it into different representations like GS1 element string (example –(01)03953720000003(10)BT290504) or EPC URI format (example – urn:epc:class:lgtin:395372.0000000.BT290504).
Features
In comparison to the other object types the lot has the following specific attributes:
-
GTIN
-
Lot Number
-
Expiry Date: This field denotes the date when a serialized trade item or batch expires.
-
Manufacturing Date: This field denotes the date when a batch, and therefore all serialized trade items belonging to that batch, has been produced.
A Serialized Trade Item (SGTIN) typically represents a saleable and uniquely identifiable pharmaceutical product.
Serialized Trade Items are identified by GTIN and the serial number. It can be converted into different representations like GS1 element string (for example, (01)07501200000027(21)81502241000000000004) or EPC URI format (example, urn:epc:id:sgtin:750120.0000002.81502241000000000004).
A serialized shipping container code (SSCC) is a uniquely identifiable transport unit like a pallet or a carton. Serialized containers typically carry a hierarchy of lover level SSCCs and hierarchies of SGTINs. The top level SSCC of a packaging hierarchy is the object which is tracked and traced in the supply chain and all events captured with respect to the top level object are inferred to the child objects.
- Details
- Written by: Ayhan Akkaya
- Category: EWM Articles
- Hits: 119
- What is Business partner?
A Business Partner can be a person, organization, group of people, or a group of organizations, in which a company has a business interest. It is the single point of entry to create, edit, and display the master data for business partners, customers and vendors. A Business Partner consists of general data like name, address, bank information, etc. as well as role specific information i.e. customer/vendor/employee data.
- Why Business Partner?
- Data Redundancy: A person can be a Vendor as well as customer, in traditional ERP we have to create two objects. With business partner single object is only required.
- Multiple Transactions: To create vendor or customer we have to go to different transactions. With Business Partner single transaction "BP" is required both objects.
- Centrally managing master data for business partners, customers, and vendors.
- Customer and Vendor Integration to Business Partner:
- Customer
- Vendor
- Business partner
In Traditional ERP, we have Customer and Vendor as different object.
For Customer, we have following views:
- General
- Finance
- Sales
For Vendor, we have following views:
- General
- Finance
- Purchasing
For creating there objects we need different Transaction code:
Customer: XD01, FD01, VD01
Vendor: XK01, FK01,MK01
In S4 HANA both customer and vendor get created with Transaction BP.
- Business Partner Customizing
4.1 Activation of PPO (Post Processing Active)
SPRO->IMG->Cross-Application Components–> Master Data Synchronization –> Synchronization Control–> Activate PPO Request for platform objects in the dialog

After this click on the check box.
4.2. Activate synchronization between Business Partner and Customer/Vendor
SPRO->IMG->Cross-Application Components–> Master Data Synchronization –> Synchronization Control–> Activate Synchronization Options
4.3.Define BP Roles
SPRO->IMG->Cross-Application Components–> SAP Business Partner–>Business Partner–> Basic Settings –> Business Partner Roles–> Define BP Roles
Maintain Data for Business Roles and SAVE.

4.4.Define Number Assignment for Direction BP to Vendor/Customer
SPRO->IMG->Cross-Application Components–> Master Data Synchronization–>Customer/Vendor Integration –> Business Partner Settings –> Settings for Vendor Integration –> Field Assignment for Vendor Integration–> Assign Keys

Maintain and select the check box if you want the Business Partner number and Vendor number to be same.
4.5.Define BP Number Range and assigning to BP Grouping
Cross-Application Components–> SAP Business Partner–> Business Partner–> Basic Settings –>Number Ranges and Groupings


4.6. Managing Fields in Vendor and Customer Master.
IMG>Logistics general>Business partner>Vendor>Define account grp and field selection
IMG>Logistics general>Business partner>Customer>Define account group and field selection
- BUSINESS PARTNER Vendor and Customer Integration.
Business Partner Tables:
| BP000 | Business partner master (general data) |
| BUT000 | General data I |
| BUT001 | General data II |
| BP001 | FS-specific attributes |
| BUT0BANK | Bank details |
| BD001 | Assign customer - partner |
| BP030 | Address |
| BC001 | Assign vendor - partner |
| BUT020 | BP: addresses |
| BUT021 | BP: address usage |
| BP1000 | Roles |
| BAS tables | Business address services tables |
| BUT100 | BP roles |
| BUT0BK | BP: bank details |
| BAS tables | Business address services tables |
| KNBK | Bank details |
| SANS1 | Addresses |
5.1 In S4 HANA when you enter T code XD01 it will redirect to BP transaction, a prompt will come that will ask you to choose Person, Organization and Group.
Here you can see that default BP role set as FLCU00 (Customer Financial Accounting)
5.2. In S4 HANA when you enter T code VD01 it will redirect to BP transaction, a prompt will come that will ask you to choose Person, Organization and Group.
Here you can see that default BP Role is FLVN00 (FI Vendor).
- Business Partner creation
6.1. General Data
Transaction code: BP
You will get a default role 000000 (Business Partner General).
Select the grouping from dropdown which decides the number range.
Enter the all mandatory fields for Business Partner General and then save.
After entering data click on save.
Business Partner General gets 1000173 created.
Table BUT000 gets updated
6.2. Vendor
To create FI Vendor, we can extend the Business Partner already created with Role FLVN00 (FI Vendor).
The role can be selected from dropdown.
Click on Company Code.
After selecting Company code press Enter and then fill the Recon account and other mandatory fields.
Note: Here you can see in the Company Code Section Vendor is mentioned as <External>.(Please refer points 4.4)
But after saving Vendor number will come same as BP number.
Tables LFA1 and LFB1 gets updated.
Extending Vendor to Purchasing Data, select Role FLVN01 from dropdown.
Select Purchasing Data and then choose Purchasing Org and press enter.
Enter all the mandatory fields.

Table LFM1 gets updated.
6.3. Customer
Extend BP to Customer Role FLCU00 for Financial Accounting.
Click on Company code and enter all the mandatory fields and then save.
Note: Here in the Company Code Section customer number is presented as <EXTERNAL>.
After saving it will get updated same as BP number.

Extend Customer for Sales Data with Role FLCU01.
Press Sales and Distribution data button and fill all the mandatory fields.

Then Save.
In a display mode, you can check all the roles Business partner having.
In the table BUT100 we also check the roles for Business partner.
After entering all the Data save the customer.
Table KNA1, KNVV gets updated.

We are now able to create Business Partner Successfully.
Thanks
Ankit Deshwal
- Details
- Written by: Ayhan Akkaya
- Category: EWM Articles
- Hits: 64
Queues
- What does Semi-System Guide processing Allows in RF TA's?
- How can you design system and picker can Pick any HU
- RF Function Keys?
- Resource & Queue Management in SAP EWM by R
- Task Interleaving
What does Semi-System Guide processing Allows in RF TA's?
- How can you design system and picker can Pick any HU
a) Allows semi-system guided processing at queue level
b) Semi-system-guided processing is allowed for HUs only. The source must be in a HU warehouse task (WT), or product warehouse task with source HU
c) If the semi-system-guided mode is allowed at queue level, the system sends the resource to a bin, and the worker can scan any HU
RF Function Keys?
F5: More F6:Clear F7:Back F8:List F9:Full message
- Details
- Written by: Ayhan Akkaya
- Category: EWM Articles
- Hits: 564
How to create and test a custom PPF Action
PPF Action is a tool for the generic execution of functions and processes. Help in triggering actions like Print, email fax, and labels.
It also triggers automatic subsequent documents and workflow.
PPF Purpose:
- Printing
- Communication with other systems like SAP ERP or GTS
- Sending XI messages
- Asynchronous updates between business objects within SAP EWM
- Execution of loosely coupled actions into the business process with the goal of having a separate application log
- Generic option to enable customer extensions of SAP EWM processes, especially for asynchronous processes, printing and workflow
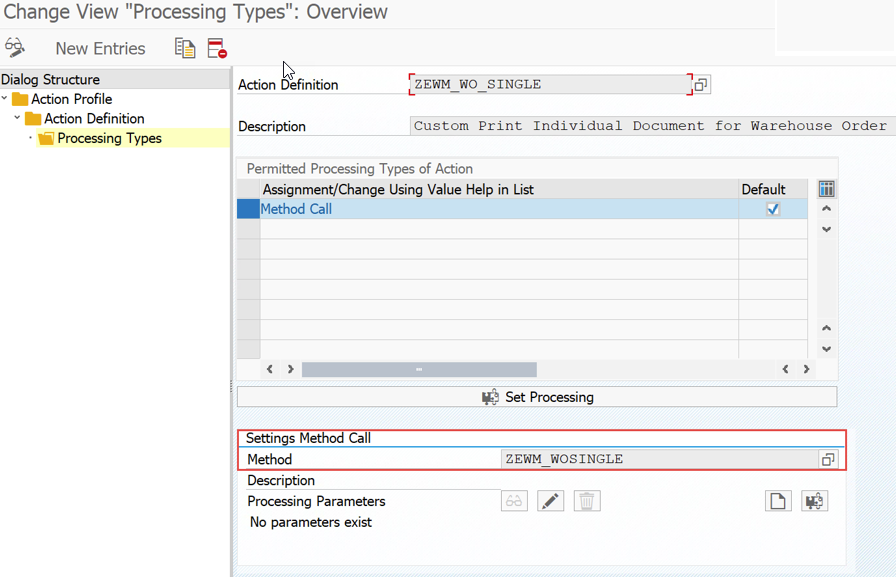
The below example is done for Warehouse Order related PPFs, but the same process applies to all other PPFs.
Navigate to the associated config in SPRO
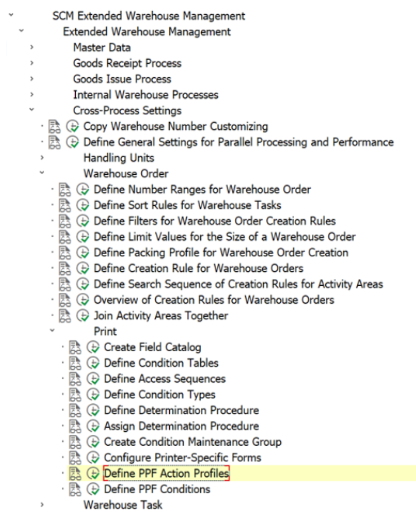
Select the relevant Action Profile
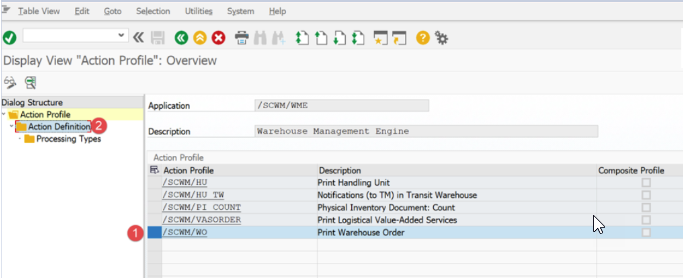
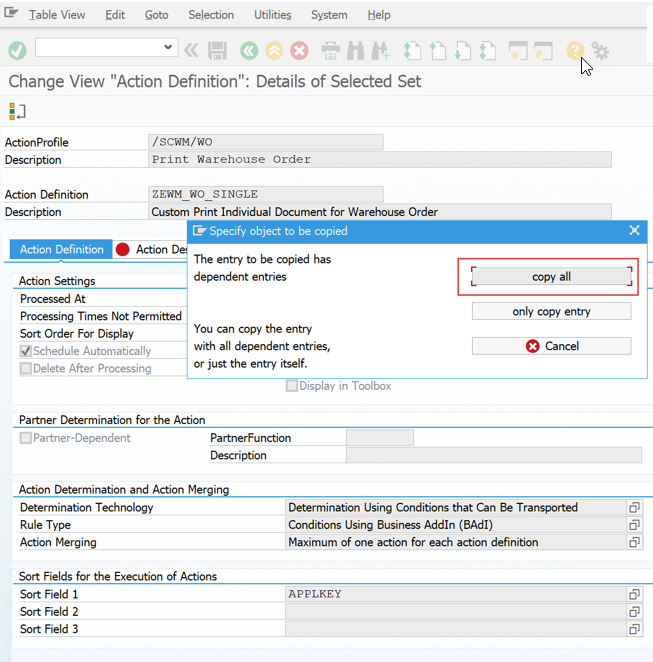
Select the Action Definition you want to copy.
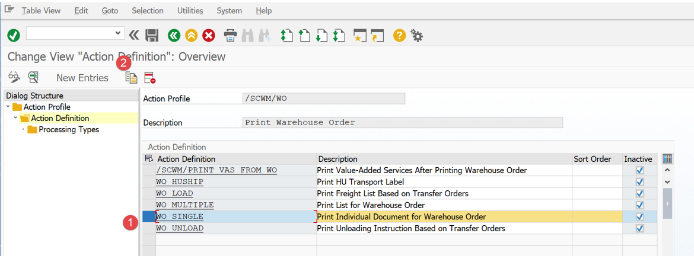
Give your PPF Action a name. It must not be the same as the one you’ve copied else it will be difficult to identify when you maintain the PPF Condition shown later in this document.
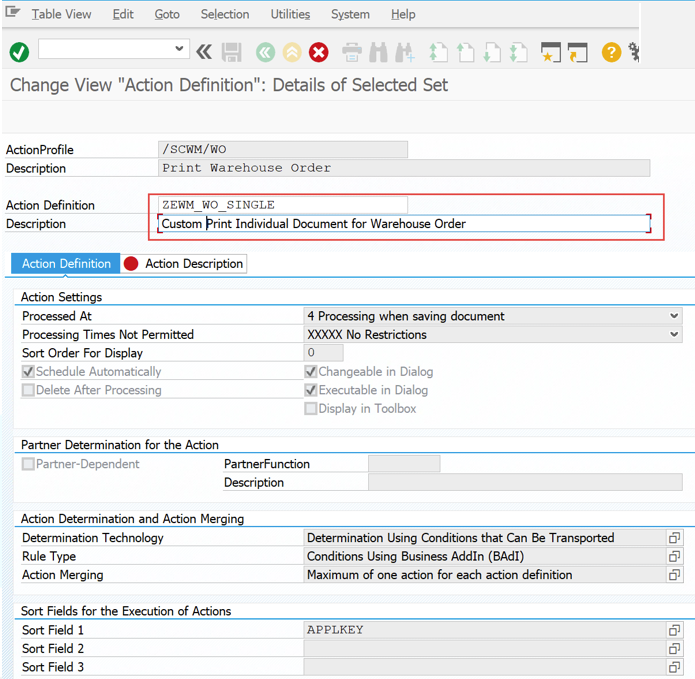
Copy all the associated entries
Save your changes
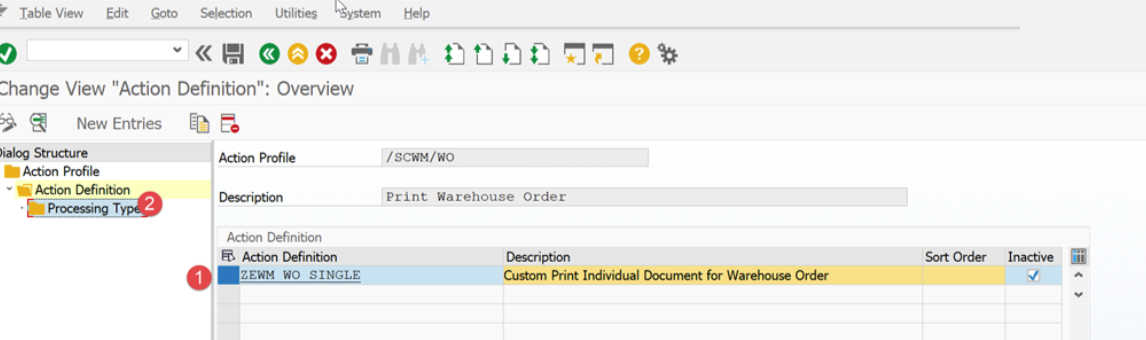
Make sure your action is not marked as “Inactive”
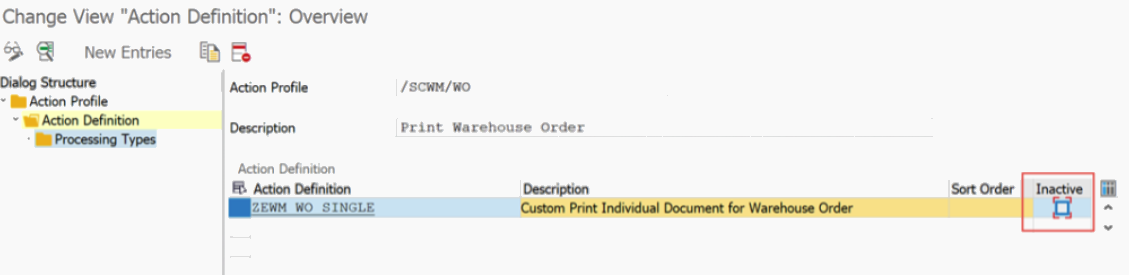
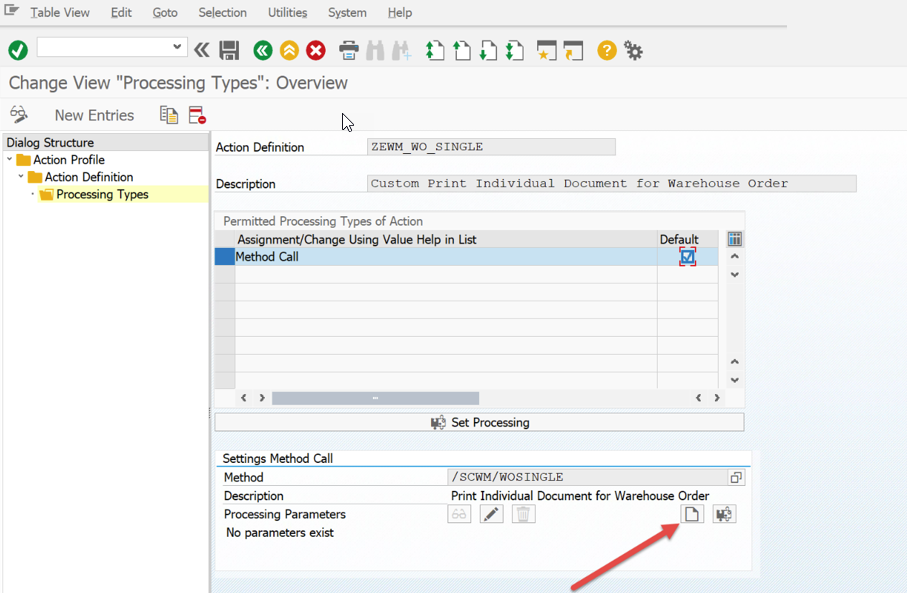
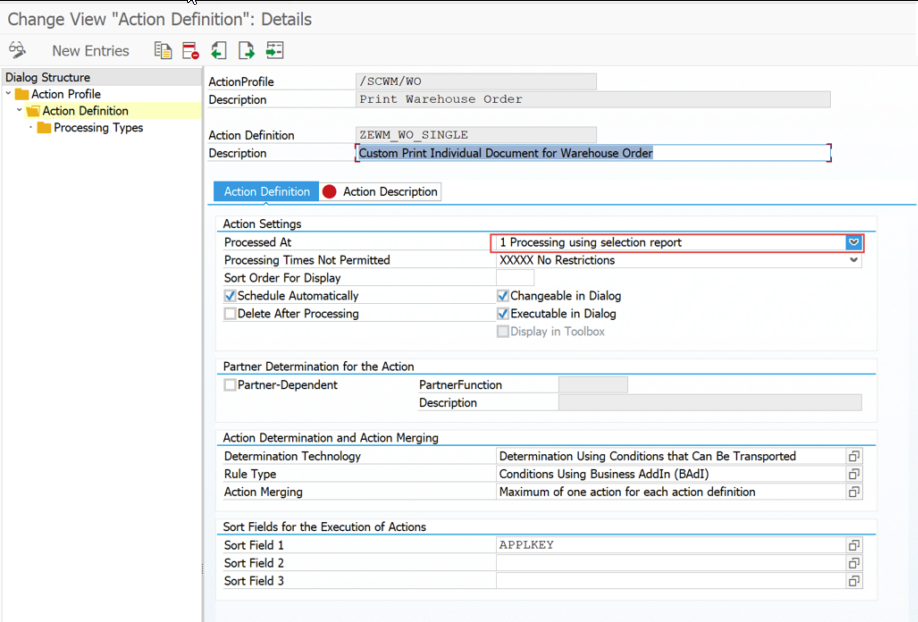
Select the Action Definition and then select the Processing Type
If you need to use custom logic to influence the result of the PPF action e.g. different information on a label, then you need to define a custom method as shown below. Select the “Create” option. Note: You will need an ABAP developer key to do this.
Create a new BAdi Filter

Name the custom implementation
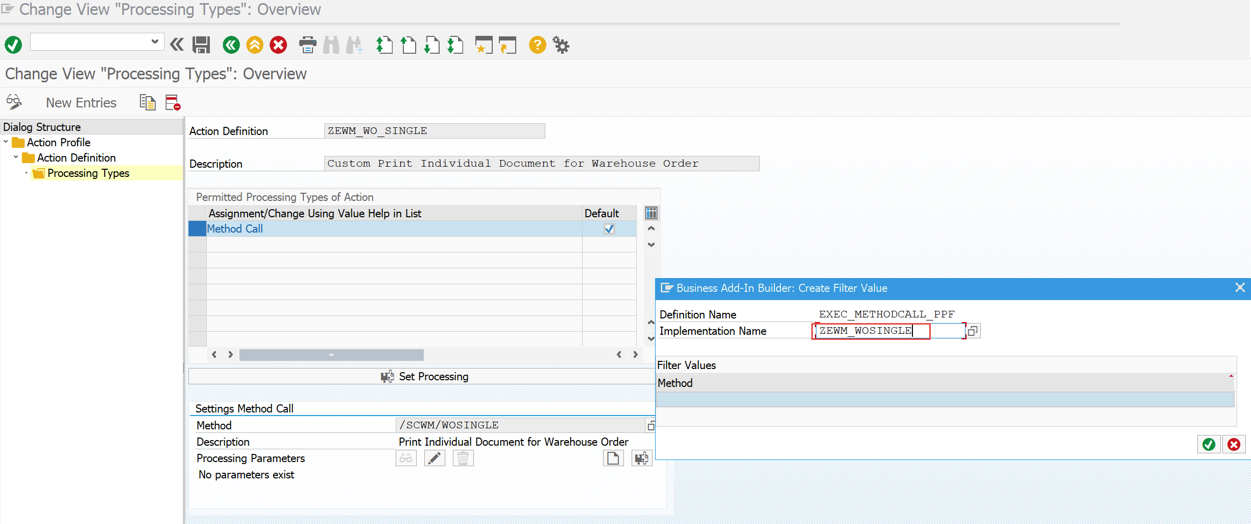
Provide the implementation short-text and then add a custom filter as shown below.
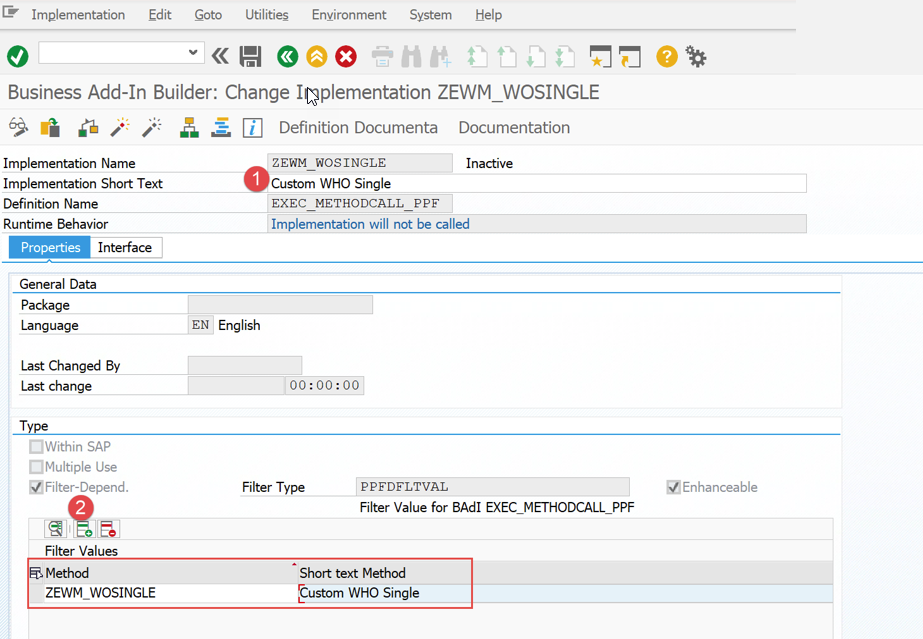
Activate the implementation.

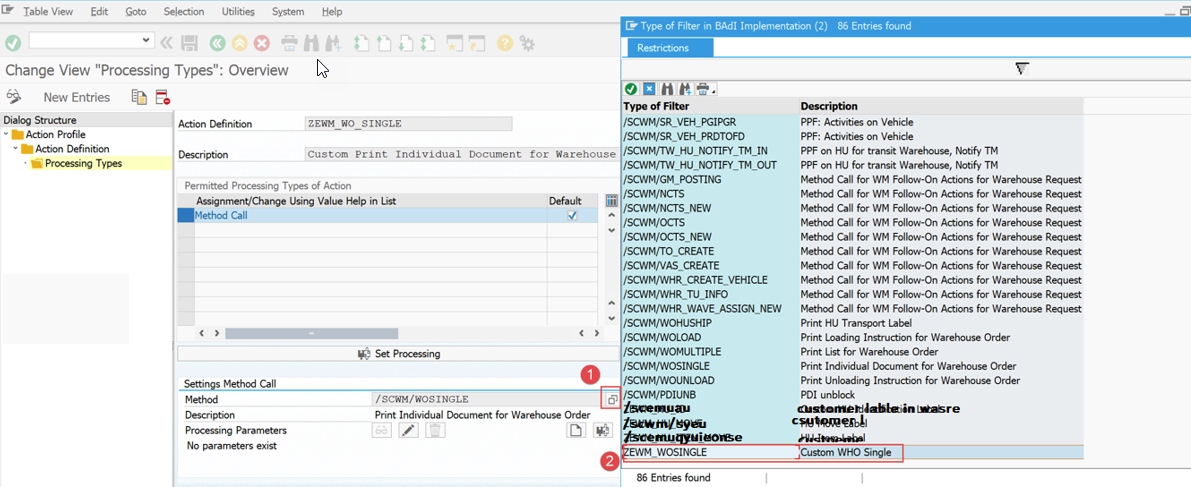
Go back to the PPF Action by pressing F3 and now select your custom filter.
Save the change
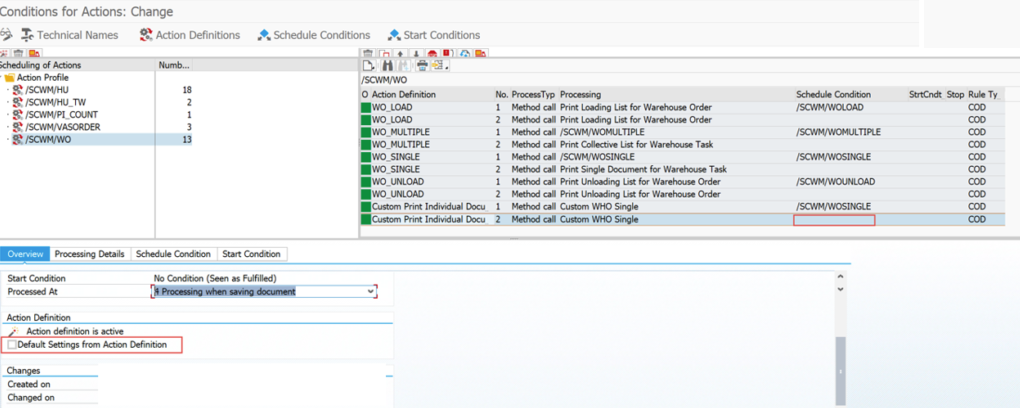
Now you need to create the PPF Condition. This is where giving your PPF Action a unique name instead of copying the standard name will come into play.
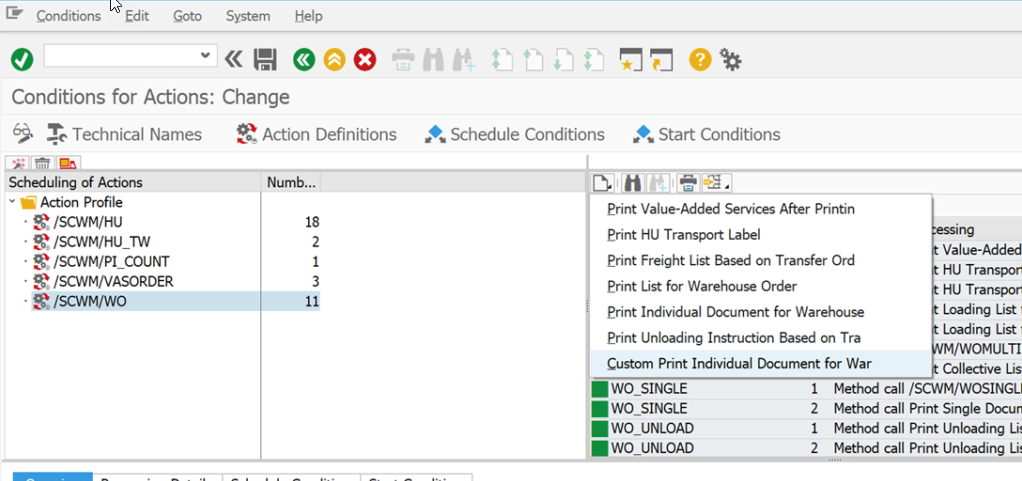
Show the technical names and then select the associated Action Profile
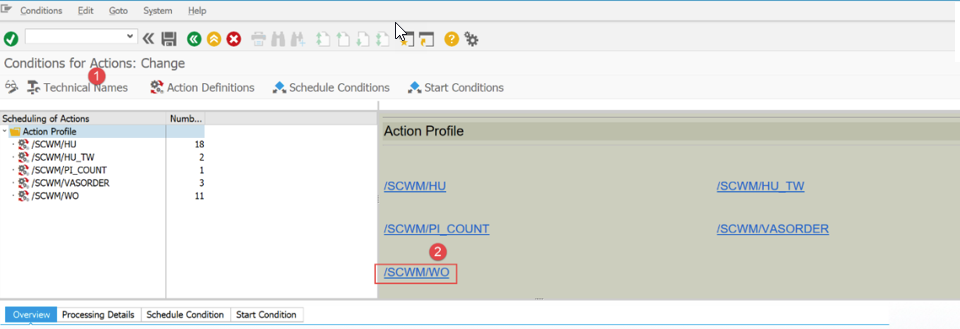
Create a new entry as shown below and select your PPF Action

Compare the Schedule Condition and Start Condition of the standard PPF Action you used when creating when creating the custom entry and then maintain the same entries on the custom action as shown below
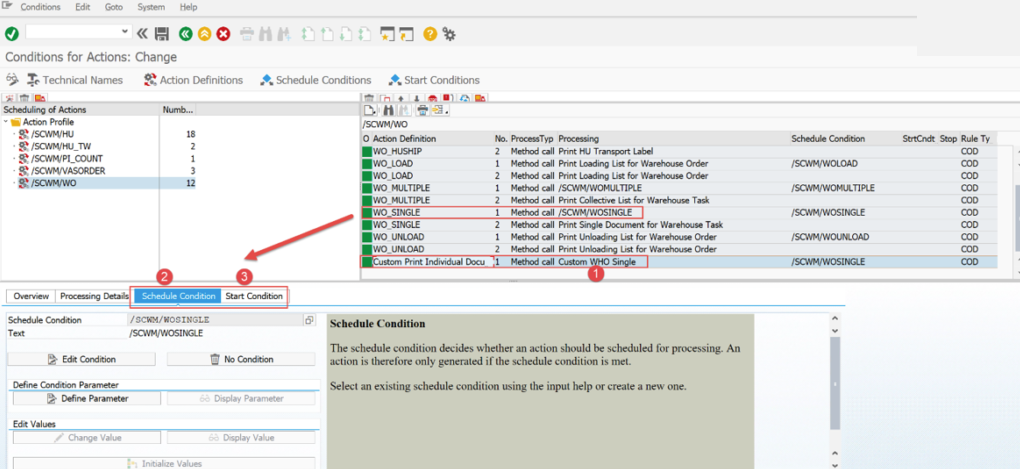
If you want to be able to manually create the PPF action e.g. via the Warehouse Monitor, then you need to add a 2nd entry as shown below.
Make sure that the 2nd entry as the “Default Settings…” unchecked as shown below. No Schedule or Start Conditions are required in this instance.
You may need to create condition records for the custom PPF Action. Tcode – /SCWM/PRWO6
Specify the maintenance group
To create a new entry, select the field shown below and specify the condition type. Maintain the required entries. Here you will specify the custom action definition and associated form. The result is that the custom action definition will be determined when the maintain conditions are true.

A practical tip to debug the custom method: PPF Actions are called asynchronously to the object that creates them and this makes it difficult to debug. In order to easily debug you should change the processing time of the PPF action to be done using a report. This means that the action is created, but not triggered to execute.
To execute the PPF you need to use T-Code SPPFP
Specify the relevant entries shown below to display the entries.
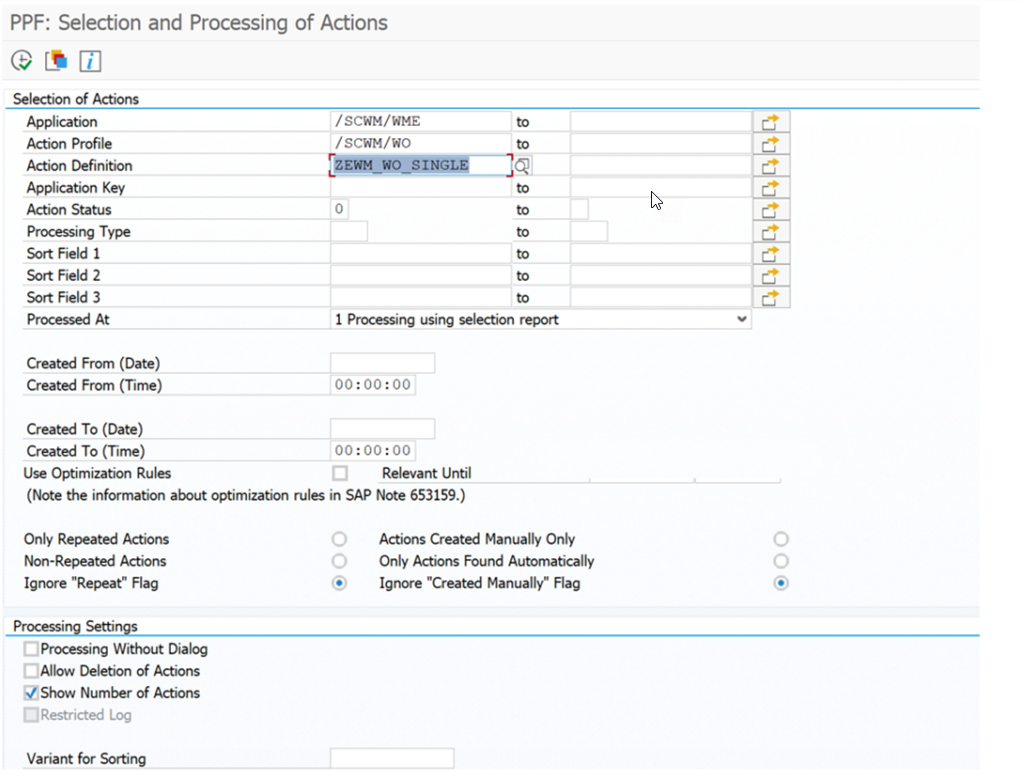
On execution, Select the relevant entry and then execute. The code should now stop in your custom method if you have added a breakpoint.
REF: https://cloudbook.co.in/blog/sap-ewm-custom-ppf/
- Details
- Written by: Ayhan Akkaya
- Category: EWM Articles
- Hits: 123
Introduction
You can use the Advanced Returns Management component in SAP ERP with SAP Extended Warehouse Management (SAP EWM) to manage returns items on storage bin level. The inspection of returns items is fully supported by the Quality Management (QM) component of SAP EWM. This integration improves the efficiency and transparency of the returns process.In this blog I would like to compare 2 scenarios of ARM integration with EWM in comparing with Customer Returns process without ARM as listed below.
- Customer Returns Process without ARM
- ARM integration with EWM Process - Inspection occurs in ERP
- ARM integration with EWM Process - Inspection occurs in EWM
The testing version is S/4 HANA 2020 - EWM Decentralized.
Process Flow
Explain ERP Storage Location maps with EWM Warehouse Avail.Grp
Before we get into detail of each process, let's have a look of current mapping between SAP ERP Storage Location and Warehouse Availability Grp & Stock Type as below.We manage returns stock in ERP Sloc RETR firstly after receiving, upon inspection decision we will transfer stock to normal Sloc GRCV or Scrapping Sloc SCRP. And in EWM we have mapping Stock type for each Sloc. Try to keep the process simple so we only have 1 Stock type (F4/F9) per Avail.Grp for Returns & Scrapping.

Customer Returns Process without ARM
In this scenario, we assume that Inspection will be manage outside SAP and decision to change stock type after Inspection have to be done manually.

ARM integration with EWM - Inspection occurs in ERP
In this scenario, Inspection happens in ERP and inspection result is sent from ERP to EWM.

ARM integration with EWM - Inspection occurs in EWM
In this scenario, Inspection happens in EWM and inspection result is sent from EWM to ERP.

Testing
Because the limitation of my current EWM system setting, I can only describe the testing for scenario ARM - Inspection occurs in EWM with 2 Cases: Inspection Decision Accepted & Inspection Decision Rejected/Scrapping.The testing for scenario ARM integration with EWM - Inspection occurs in ERP - You can reference to another blog that I attach the link in the Reference part.
Prerequisites
You have made the following settings in Customizing for Extended Warehouse Management:
- You have separated the posting of a decision and follow-up action and canceled an inspection under Cross-Process Settings -> Quality Management Basics -> Warehouse-Dependent Activation for Inspection Object Types.
- You have made the basic settings for inspection rule (master data) creation under Cross-Process Settings -> Quality Management -> Settings for Inspection Rules.
- You have defined a code group MSRDEC with assignment of allowed decision and follow-up codes (this has to be synchronized with SAP ERP) under Cross-Process Settings -> Result.
- You have set up QM for the sending and receiving locations under Cross-Process Settings -> Quality Management.
- You have maintain QM Inspection Rule under Q-Inspection Returns Tcode /SCWM/QRSETUP
ARM - Inspection occurs in EWM Process Flow Testing
Step 1: ERP Create Returns Sales Order
Tcode: VA01Returns Sales Order is created with Follow-Up Action is "Receive into Plant" and Refund Control "Standard by credit memo request".

Step 2: ERP Outbound Delivery is created.
Tcode: VL10AOutbound Delivery is created reference to Returns Sales Order, and receiving Sloc is RETR - Returns.

ERP - Check Customer Returns Overview - Tcode MSR_TRC_CAt this stage when Return Delivery is created, you can see Delivery number is updated in the Returns Steps and marked as Green - Completed, next step is GR marked blue as not yet process.

Step 3: EWM Inbound Delivery is replicated, Post GR
Tcode: /SCWM/PRDIEWM Inbound Delivery is replicated and stock supposed to be posted in F4 - Returns stock type and keep in QI-ZONE.

Post GR and GR status is completed.

ERP - Check Returns OverviewAfter GR posted in EWM, it sends update to ERP and Goods receipt movement is created and marked as Green - Completed, next step is Inspection.

Display GR Document, it's posted with Mvt653 and to Sloc RETR.

Step 4: EWM Inspection
Tcode: /SCWM/QINSPThere are 2 Items in Delivery, I will set Item 10 - Material A as Inspection pass and Item 20 - Material B as Inspection fail, then we can compare the difference.Item 10 - Perform Inspection Decision: Accept - Quality check passed.First step to create new HU because current HU is the dummy one. Then choose the Decision as 0001 - OK, Accepted; and assign Dest. HU as new created HU.Note the Inspection Type before making Decision is A.

Save the inspection decision and you can see Inspection Type changed to C now. You can mark Completed Process Step for HU if storage processes related.

EWM - Stock Overview: Material A is updated as F1 - Goods in Putaway.

ERP - Check Returns OverviewInspection result is sent from EWM to ERP and updated in Returns Steps. Here Inspection result and Transfer Posting are marked Green - Completed. Next step in ERP is to create Credit Memo.

Display ERP Inspection, Follow up Activity is "Transfer to Free Available Stock".

Display Transfer Posting, it transfers from Sloc RETR to GRCV.
![]()
Item 20 - Perform Inspection Decision: Reject/ Scrapping - Quality check failed.First step to create new HU, then choose the Decision as 0003 - Scrapping and assign Dest. HU as new created HU. Note that Inspection Type change from A to C after Save Inspection result.


EWM Stock Overview, stock type is changed F4 -> F9.

ERP - Check Returns OverviewInspection result is sent from EWM to ERP and updated in Returns Steps. Here Inspection result and Transfer Posting are marked Green - Completed.

Display ERP Inspection, Follow up Activity is "Transfer to Specified Stock".

Display Transfer Posting, it transfers from Sloc RETR to SCRP.
![]()
Step 5: EWM Create Warehouse Task for Putaway & Confirm WT
This step is managed in EWM to finish EWM putaway step and has no impact to further Credit Memo step in Returns process in ERP, means Credit Memo step can happen in parallel.

Create WT as Follow-On Function in Inbound Delivery and confirm WT as normal.

EWM - Stock Overview: After Putaway Material A to Normal Rack, Stock type change F1 -> F2; Putaway Material B to Clearing Zone for scrapping, Stock type has no chance.

Step 6: ERP Process Credit Memo & Payment
Those steps belong to Accounting department which I don't get in detail. Statuses are updated in Returns Overview as well.

--- END ---Thanks for reading, I would like to receive any feedback or comment from you.Best Regards,Van Bao Dang
Reference
SAP Help - ARM with EWM https://help.sap.com/docs/SAP_EXTENDED_WAREHOUSE_MANAGEMENT/3d97bec9bf1649099384bb8167df3cf2/570d7a2...
ARM with inspection occurs in ERP Blog - https://blogs.sap.com/2021/07/08/advanced-return-management-integration-to-sap-s-4-hana-embedded-ewm...